이전 포스트
Front-end(xCode)
1. Capability에 push Notification 및 Background Modes 추가
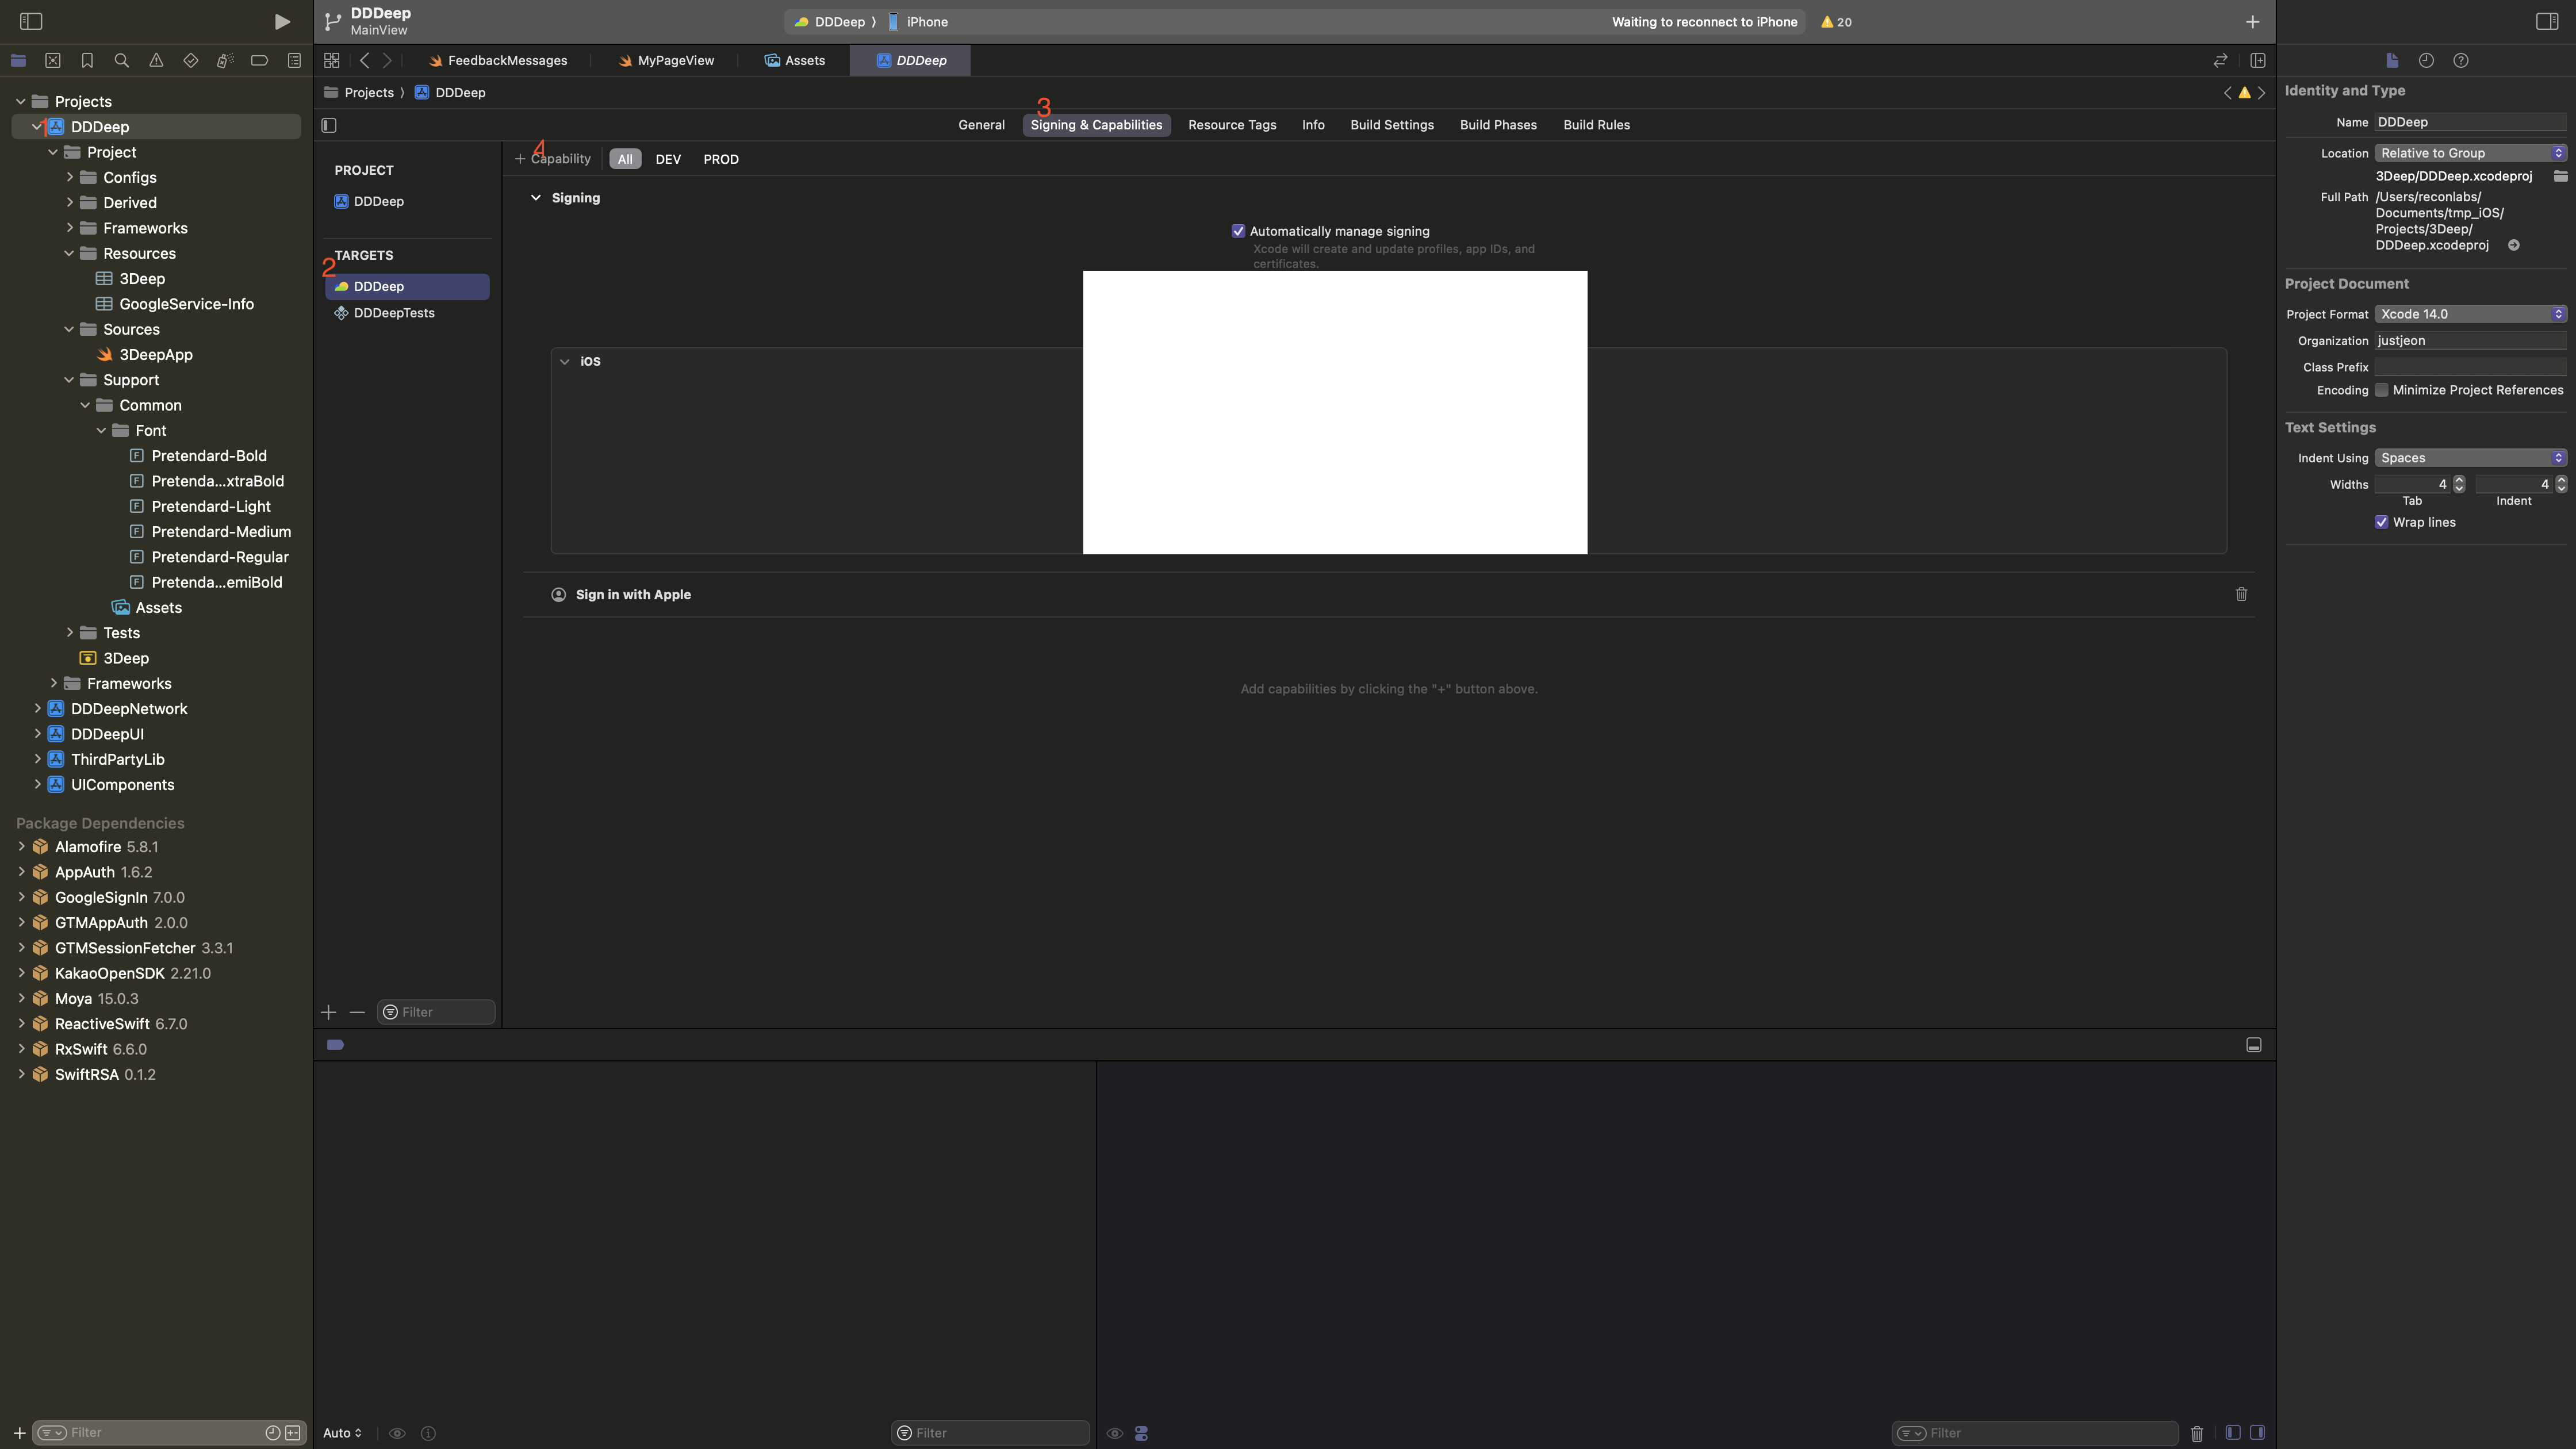
위에 이미지를 보면 빨간색 글씨로 순서가 적혀있는데, 해당 순서대로 클릭을 하면 추가를 할 수 있다. Push Notification은 별도의 설정 없이 추가하면 되고, Background Modes를 추가 하면 modes가 여러개있는데, 그 중에서 Remote notifications 옵션을 선택하면 된다.
2. App Delegate Code 추가
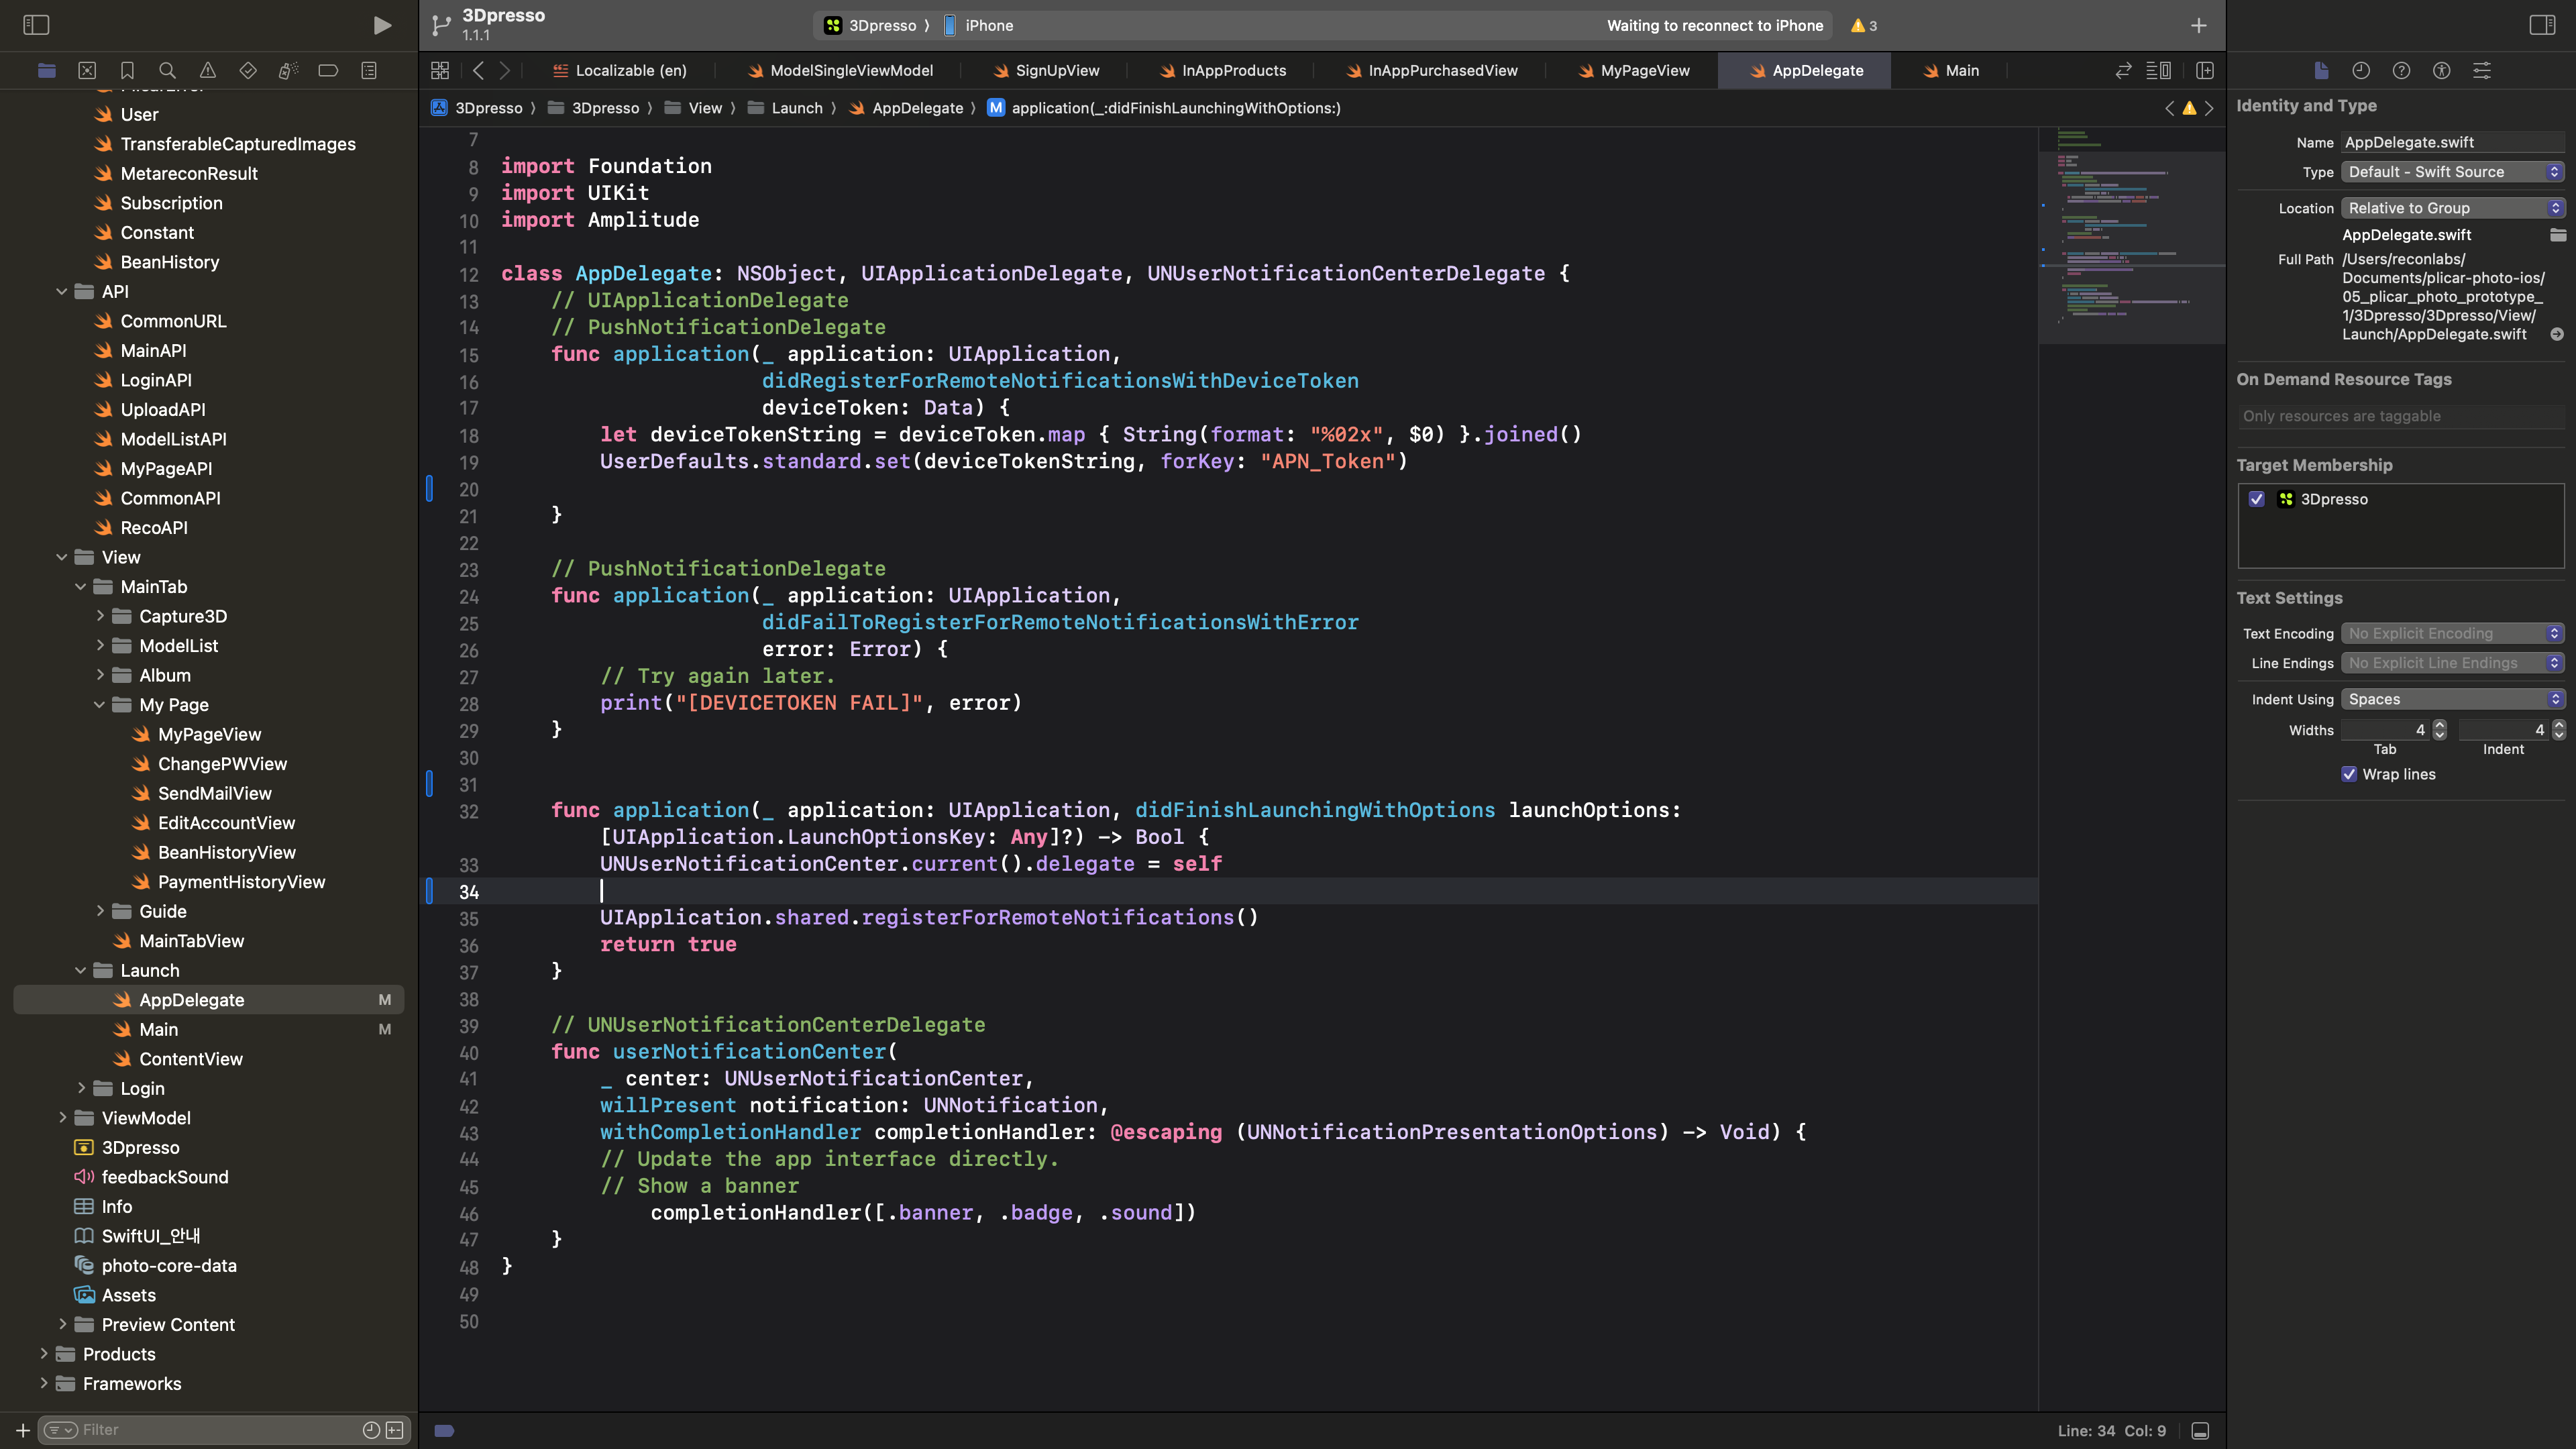
App Delegate에 UNUserNotificationCenterDelegate 프로토콜을 추가한 뒤, 해당 함수들을 App Delegate에 추가한다.
UIApplicationDelegate
- func application(_ application: UIApplication, didFinishLaunchingWithOptions launchOptions: [UIApplication.LaunchOptionsKey: Any]?) -> Bool
앱이 성공적으로 시작이 되면 실행되는 함수
UNUserNotificationCenterDelegate 프로토콜을 연결하고 notification 등록. - func application(_ application: UIApplication, didRegisterForRemoteNotificationsWithDeviceToken deviceToken: Data)
APNs token을 Data Type으로 주는 함수
해당 Data를 16진수 String으로 타입 캐스팅 후 저장 - func application(_ application: UIApplication, didFailToRegisterForRemoteNotificationsWithError error: Error)
푸시 알림이 실패하는 경우 호출하는 메서드
UNUserNotificationCenterDelegate
- func userNotificationCenter(_ center: UNUserNotificationCenter, willPresent notification: UNNotification, withCompletionHandler completionHandler: @escaping (UNNotificationPresentationOptions) -> Void)
푸시알림이 올때 실행되는 메서드
option을 통해 벳지, 사운드, 배너, 긴급 알림 등을 설정할 수 있다.
SwiftUI를 사용하는 경우

UIKit으로 UI를 작성한다면, 프로젝트를 생성할 때 기본적으로 AppDelegate가 생성된 채로 나와서 상관이 없지만, SwiftUI로 UI Framework를 사용하는 경우에는 직접 AppDelegate를 만들고 코드를 작성해야한다. AppDelegate는 SwiftUI의 앱 프로토콜에서 사용할 수 없는 프로토콜인데 UIApplicationDelegateAdaptor 프로퍼티 래퍼를 사용하여 AppDelegate를 추가해야하는데, 이 프로퍼티 래퍼는 기존 UIKit 앱 델리게이트 클래스를 SwiftUI 앱에 통합할 수 있다. 이를 통해 UIKit으로 작성된 기존 앱 델리게이트의 기능을 활용하고 이를 SwiftUI와 함께 사용할 수 있다.
3. APNs Token을 Back-end에 전달
Back-end
https://developer.apple.com/documentation/usernotifications/sending-notification-requests-to-apns
Sending notification requests to APNs | Apple Developer Documentation
Transmit your remote notification payload and device token information to Apple Push Notification service (APNs).
developer.apple.com
준비사항
이전에 포스팅을 보면 기억해야할 값들이 몇개가 있다고 하면서 적어놓은 것이 있는데 벡엔드를 구현할 때 활용하기 위한 값들이다. 해당 값들이 어디에 있는지 확인하고 싶으면 이전 포스트를 참조하면 된다.
- Team ID : 애플 계정의 Team ID(10자리)
- Project Bundle ID
- key ID : .p8 파일의 이름
- privateKey : .p8 파일안에 있는 값
- APNs Token
Back-end에서는 이 값들을 통해 애플에서 제공하는 API를 호출하면 해당 토큰을 가지고 있는 디바이스에 푸시 알림이 정상적으로 동작한다. 아래는 아주 기본적인 푸시알림을 만드는 API를 아주 간략하게 적어놓은 것이고, 위에 Docs 링크를 통해 body나 header을 커스텀해서 다양한 알림이 구현 가능하다.
API
- Method : POST
- URL
- Prod : api.sandbox.push.apple.com
- Sandbox : api.push.apple.com
- Path : /3/device/{APNs token}
- Header
- apns-topic : Project Bundle ID
- apns-push-type : alert
- authorization : 해당 json을 privatekey로 암호화(ES256)하여 만든 베리어 토큰
- algorithm : “ES256”
- expireIn : “1h”(토큰의 유효기간 최대 1시간)
- issuser : Team ID
- keyid : Key ID
- Body
“aps” : {
	“alert” : {
	“title” : String,
	“subtitle” : String,
	“body” : String
	}
}'Swift' 카테고리의 다른 글
| 프레임워크 vs 라이브러리 (0) | 2025.04.07 |
|---|---|
| Apple Push Notification 설정(1) (0) | 2024.08.25 |
| [Swift] Privacy Info (0) | 2024.08.18 |
| <Value Type> Set (1) | 2024.03.03 |
| 14. UI Test (0) | 2022.12.31 |